Jus finished the paint job on Enact.. plus panel lined it. Took up most of my sunday. tired. x.x but i guess it was worth it.. =) Enact is my first 1/144 kit tt i took seriously, to make it as accurate as possible without painting the whole kit. Other den it being a dish for Gojira.. XD Quite happy with the result, Gojira is too! *Grwar* i'll wait for a sunny day tml to do a final sealing topcoat.. ^^.
Showing posts with label Tutorial. Show all posts
Showing posts with label Tutorial. Show all posts
Monday, November 2, 2009
Friday, September 25, 2009
MG RX-78-2 Ver.OYW W.I.S.P Part 4
PANEL LINING.
back to give a small update on my RX-78-2... actually no. im too stressed over my panel-lining tt i decided to stop, rest and blog abt it. (X.X) notice the panel lining is THICK, which basically sums up this entry. its very very slow indeed.. i tot the worst part of building him was over.. which i tot was the painting part.. BUT. BUT. BUT. turns out tt the panel lining is giving me a HUGE wet blanket.. so much problems panel lining.. its very much UNLIKE panel lining plastic straight on.. where you can jus wipe it off with your hands or cotton bud if you make any mistakes...
Panel lining (スミいれ, say su-mi-ee-re) on painted surfaces for me is especially hard.. cos it causes alot of smudges for me.. and requires alot ALOT of cleaning up... onli to use the gundam markers in the end; which defeats the purpose of pane washing and wasnt wad i've planned in the beginning. more on that problem lata.. =(
Some tools and paint which im using now..
1. Tamiya X-1 (black enamel paint oil based)
2. Tamiya X-20 (enamel thinner)
3. Gundam Marker (Sumi-ire marker oil based)
4. Metal trays and mixer for mixing paint
5. Wooden sticks, common cotton buds and kitchen towel for cleaning up.
As i had sprayed painted my RX-78-2.. its alr coated with lacquer based paint.. so using enamel paint for panel wash is not a problem for me.. or so i've tot. XD i even coated it with another layer of Super Clear Gloss which is oso a lacquer based.. extra protection when panel washing and putting decals. With such preparations... i tot i can breeze thru panel lining like i did on bare plastic surfaces. Boy, i was so wrong.
Mixing the paint and thinner wasnt hard.. and letting the paint flow wasnt hard too.. the hard part was the cleaning up.. after doing hours of researching.. all i saw was simple cleaning up.. using a cotton bud with abit of thinner.. gently brush thru the parts and its done!
But for me.. i think i coated the parts with too much paint? a solid layer of surfacer.. a base coat and a final coat of colour with super clear gloss coat proves too much for my pieces. i think many no-so-deep panel lines became a shallow bare line after all tt layers. so while the wash does flow.. after cleaning up with the cotton bud, the line got erased as well.. very frustrating! a big lesson learnt. Not too much paint next time. i have to end up using gundam markers to touch up or draw straight lines. which is THICK. TT.TT And, Gundam marker has different properties to enamel paint as well. although its oso oil based, i find it hard to erase using the enamel thinner. it takes ard X10 more effort to rub off the stains left behind. SO pls be careful using gundam markers on painted surfaces..
While cleaning up.. i've also found out something.. while rubbing over the washed parts.. i find tt the gloss coat is also coming out.. its a very slight difference.. but under light, its very obvious as light reflects differently. So, is Super Clean Coating over the parts redundant?? haiz.
anyone has the solution to my problem?? realli need your help.. =(
here i got an example of staining.
This is wad i've done so far.. for panel lining tt is. So far i've onli panel lined the left leg.. very stress when i start to think abt how the WHOLE RX-78 is gonna turn out..
That's all i have for you!! Suggestions and comments are greatly appreciated! Thanks for reading. =)
(^^)" レンです! じゃね!
back to give a small update on my RX-78-2... actually no. im too stressed over my panel-lining tt i decided to stop, rest and blog abt it. (X.X) notice the panel lining is THICK, which basically sums up this entry. its very very slow indeed.. i tot the worst part of building him was over.. which i tot was the painting part.. BUT. BUT. BUT. turns out tt the panel lining is giving me a HUGE wet blanket.. so much problems panel lining.. its very much UNLIKE panel lining plastic straight on.. where you can jus wipe it off with your hands or cotton bud if you make any mistakes...
Panel lining (スミいれ, say su-mi-ee-re) on painted surfaces for me is especially hard.. cos it causes alot of smudges for me.. and requires alot ALOT of cleaning up... onli to use the gundam markers in the end; which defeats the purpose of pane washing and wasnt wad i've planned in the beginning. more on that problem lata.. =(
Some tools and paint which im using now..
Some tools i'm using..
Anyone knows wad the pin is for under the cap?
1. Tamiya X-1 (black enamel paint oil based)
2. Tamiya X-20 (enamel thinner)
3. Gundam Marker (Sumi-ire marker oil based)
4. Metal trays and mixer for mixing paint
5. Wooden sticks, common cotton buds and kitchen towel for cleaning up.
As i had sprayed painted my RX-78-2.. its alr coated with lacquer based paint.. so using enamel paint for panel wash is not a problem for me.. or so i've tot. XD i even coated it with another layer of Super Clear Gloss which is oso a lacquer based.. extra protection when panel washing and putting decals. With such preparations... i tot i can breeze thru panel lining like i did on bare plastic surfaces. Boy, i was so wrong.
Mixing the paint and thinner wasnt hard.. and letting the paint flow wasnt hard too.. the hard part was the cleaning up.. after doing hours of researching.. all i saw was simple cleaning up.. using a cotton bud with abit of thinner.. gently brush thru the parts and its done!
But for me.. i think i coated the parts with too much paint? a solid layer of surfacer.. a base coat and a final coat of colour with super clear gloss coat proves too much for my pieces. i think many no-so-deep panel lines became a shallow bare line after all tt layers. so while the wash does flow.. after cleaning up with the cotton bud, the line got erased as well.. very frustrating! a big lesson learnt. Not too much paint next time. i have to end up using gundam markers to touch up or draw straight lines. which is THICK. TT.TT And, Gundam marker has different properties to enamel paint as well. although its oso oil based, i find it hard to erase using the enamel thinner. it takes ard X10 more effort to rub off the stains left behind. SO pls be careful using gundam markers on painted surfaces..
While cleaning up.. i've also found out something.. while rubbing over the washed parts.. i find tt the gloss coat is also coming out.. its a very slight difference.. but under light, its very obvious as light reflects differently. So, is Super Clean Coating over the parts redundant?? haiz.
anyone has the solution to my problem?? realli need your help.. =(
here i got an example of staining.
You can see the square small window that i jus lined with marker becos using wash and cleaning up would erase the whole thing!! ARGH. and the smudges left behind after cleaning. need to clean a few more times to completely remove the stain.
This is wad i've done so far.. for panel lining tt is. So far i've onli panel lined the left leg.. very stress when i start to think abt how the WHOLE RX-78 is gonna turn out..
Left leg.
That's all i have for you!! Suggestions and comments are greatly appreciated! Thanks for reading. =)
Labels:
Gundam ガンダム,
MG RX-78-2 Gundam Ver.OYW,
Tools,
Tutorial
Thursday, September 17, 2009
MG RX-78-2 Ver.OYW W.I.S.P Part 2
Jus gonna update you guys wad i did in these few days.. after priming and painting my internal frame.. i decided to add some details to the frame... soooooo... the next leap for me is to paint the 'hydraulic pumps' on the legs and some minor detailing...
As you guys noe.. or dunno.. RX-78-2 Ver.OYW's LEGS uses the OLD Ver.1.5 RX-78-2's legs.. so the WHOLE leg is molded together.. with the hydraulic pumps locked to each other.. unlike the newer models now.. i.e Force Impluse.. where the rods and pump is molded seperately, making it easier to paint. So.. it has always been a problem to me.. as a new modeller painter.. on how to paint the pump without scraping the paint when its close...
My solution came to me frm Japan.. literally. hahah.. and tt's Kawaguchi Sensei.. =DD i consulted him abt the problem and he told me to thin down the rods so as when you paint.. the new layers of paint would not be scratched when you closed it.. so i followed his advice..
Painted half the pumps alr.. its molded together so i cant separate it.. i placed some blu tack behind to keep the rods frm sliding.
As you can see.. i used Gundam markers as its easier for my first try. Wanted to get the Metallic Silver Chrome Gundam marker, but apparently its sold out in my country since last year. =( so i could onli settle for a lesser silver. better den nth for me. ^^.
Closer look.. a painted and a primed.
After finishing the pump.. i looked for some details that i can paint.. ^^. near the upper things and the foot thrusters.. very happy with the results!
This is how it looks like after i assemble it on to the main body.. maybe i'll do some dry brushing after that.. some silvering on the internal frame.. woooo..
That's all i've done! would be starting to spray paint the armor and such.. its gonna be a slow process... so pls wait patiently for my next post! haha... hope you like wad you see... any questions or comments pls let me noe k!
(^^)" レンです! じゃね!
Labels:
Gundam ガンダム,
MG RX-78-2 Gundam Ver.OYW,
Tutorial
Sunday, September 13, 2009
Gundam Fiesta Singapore 2009! 第三回
Today, Ren and Tako went Gundam Fiesta to see Kawaguchi Meijin!!!! For those who don't know who Mr Kawaguchi Meijin is.. He is DA MAN who created Master Grade Gundam for BANDAI. That's RIGHT, everyone of your MG Gundams has gone thru him before it hits the shelf at your local hobby shop. wooo.. Ren is very excited.. (i registered myself for the consultation session) to be able to talk and consult him abt his model.. and learnt alot frm him... 嬉しがった!
Before i start.. jus some photos i took while in the activity caravan a few days back.. i was attending the Gundam model tutorial where they let us make our models... Models provided of cos! =)
okays.. let's start.. Some of the things Kawaguchi sensei done today..
In the end.. Kawaguchi sensei DID finished first.. of cos.. but the prize is given to someone who finished first other den Mr Kawaguchi sensei.. I went shopping with Tako while they were fixing..
Our LOOTS of the day..
So.. that is all i have frm the Gundam Fiesta Singapore 2009! Hope you enjoyed everything here.. love to hear for you guys! cheers.
(^^)" レンです! じゃね!!
Before i start.. jus some photos i took while in the activity caravan a few days back.. i was attending the Gundam model tutorial where they let us make our models... Models provided of cos! =)
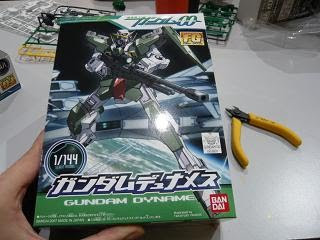
This time i got a Dynames Gundam.. Cool.. Gonna paint it so i have not applied the stickers.. He's oso gonna be a test bed for a few of my new techniques i've learn.. wahhaha
okays.. let's start.. Some of the things Kawaguchi sensei done today..
When i first arrived, caught Meijin signing some autographs..
Meijin's giving a walkabout and helping some kids in the activity caravan today.. He's like my Japanese Santa.. hahah. oh.. the lady is turquoise is the translator.
Before my consultation.. Meijin give an hour long tutorial abt assembling Gundam.. its more targeted towards younger audiences as the Gundam used was frm SD Sangouku..
Meijin setting up his 'weapons'.. boxes and boxes of tools. ^^
Meijin did some demonstration on how to apply stickers on SD figures.. especially
Sangoku series.. where there's a lot of uneven areas.. He also taught us how to remove the white nubs on plastic after cutting it of the runners... and some other basic techniques like painting with gundam markers..
During my consultation.. i asked a few questions when he came ard to visit me.. i brought the internal frames of RX-78-2 Ver.OYW with some armor in questions.. i think out of my questions.. the only one that would be helpful to the general gunpla modellers is how to fix the issue of loose joints..
*IMPORTANT!!* How to fix loose joints.
The example i gave was MG Gundam Exia.. pointing to the guy across me. haha. and Kawaguchi sensei told me.. becos polycap is a made of soft material.. so overtime it would definitely become loose.. one way to solve this problem is, at the 'mouth' of the polycap, the concave area where the ball will be inserted, cut a small piece of any normal plastic bag in a round shape (more if needed), and place it at the mouth, den insert the ball into the polycap. Thus the plastic sheet would be effectively between the polycap and ball-bearing. This sheet of plastic will become a grip between the ball and the socket.. COOL.. wad do you guys think?? i have not tried it out yet.. cos i haven got this problem... maybe you guys can try it and let me noe!! =) sorrie for the lack of illustration...
Kawaguchi sensei giving some tip abt scribing panel lines on MG Exia.. you can use many layers of masking tape (for painting) overlapping it and use it as a guide. He also mentioned something noteworthy.. that is when scribing lines.. move the PART instead of the knife so as to ensure a firm grip on the knife.. cool tips.
While i was with Kawaguchi Meijin.. i got him to sign my RX-78-2 Ver.OYW manual!! wahaha.. very momentous as it was my first painted Gundam and consulted by him!! ^^"
After the consultation.. Mr Kawaguchi sensei had a VS speed building competition with the audience.. VS Mr Kawaguchi??? haha.. the winner would receive a Limited Edition Not-for-sale 1/144 HG RX-77 Guncannon Crystal version.. 4 members were selected and up the stage they go.. The piece used is the FG Gundam Kyrios.. same as mine the last time..
Mr Kawaguchi started with pasting the sticker first.. that's when the winner had been decided. hahaha..
In the end.. Kawaguchi sensei DID finished first.. of cos.. but the prize is given to someone who finished first other den Mr Kawaguchi sensei.. I went shopping with Tako while they were fixing..
Our LOOT
Tako bought the HG 1/144 RX-78-2 Gundame Ver.G30th.. She liked something realli classic. We were pondering whether to get the 1/144 HG Raiser 00 Crystal Ver. Event Exclusive too but we decided on this instead.. This Ver.G30th is based on the the BIG G at Odaiba which is being deconstructed as we speak.. TT.TT very very sad.. din get to see it personally.
So.. that is all i have frm the Gundam Fiesta Singapore 2009! Hope you enjoyed everything here.. love to hear for you guys! cheers.
(^^)" レンです! じゃね!!
Labels:
Gundam Fiesta,
Gundam ガンダム,
Kawaguchi Meijin,
Tutorial
Subscribe to:
Posts (Atom)


